Building azure infrastructure with terraform
In the previous article, we introduced the concept of Terraform. today we will detail some best practices about using Terraform and setting up continuous deployment and testing for Microsoft Azure infrastructure.
At the end of this article you will be able to build, change, and destroy Azure infrastructure using Terraform Step-by-step.

Before going deep into the technical details, I recommend you to come back briefly to this article “link” to have an idea about the Infrastructure as Code and the concept of Terraform which is really important.
Prerequisites:
Before you start you must have:
- A Microsoft Azure account, you will need a valid and active Azure account (https://azure.microsoft.com/en-us/free/ ).
You also need to install:
- Terraform 0.14.9 or later (https://learn.hashicorp.com/tutorials/terraform/install-cli?in=terraform/azure-get-started).
And finally you must have:
- The Azure CLI Tool installed.
Install Terraform for windows:
1- To install Terraform, find the appropriate package for your system in this link ( https://www.terraform.io/downloads.html ) and download it as a zip archive.
2- After downloading the correct Terraform binary, unzip the package into your desired folder.
3- Finally, add the terraform binary to your PATH.
- Access the location of your file

- Run the commande below

4- Verify that the installation worked by opening a new terminal session and type the following command

Install the Azure CLI tool:
You will use the Azure CLI tool, because Terraform must authenticate to Azure to create infrastructure.
Open your PowerShell prompt as an administrator and run the following command:
1/
In your terminal, use the Azure CLI tool to set up your account permissions locally.
2/az login
Your browser window will open and you will be prompted to enter your Azure login credentials.
Once you are connected, you have to create your configuration file.
you will create a Terraform configuration to deploy an Azure resource group.
Create your initial configuration for windows:
To write your Terraform code, all you have to do is create a folder under which, you create a file with the extension .tf , e.g. main.tf, with any code editor:
1/ Create a folder called Terraform-Azure

2/ In that folder Create a new file called main.tf.

In this file, you will start by declaring your provider that serves as authentication to Azure.Then, you have to write the resources you want to provision, for example to create a Resource Group. Here is the necessary code:

- location- (Required) The Azure region in which the resource group should exist. Changing this forces the creation of a new resource group.
- name- (Required) The name that should be used for this resource group. Changing this forces the creation of a new resource group.
Note: If you are a Visual Studio Code user, you can download Azure Terraform and the Terraform extensions. Both extensions will help to work with Terraform and get syntax highlighting and intellisense!
Initialize your terraform configuration:
The first command to run for a new configuration → terraform init.
Terraform init will automatically download and install any binaries required by the providers specified in the configuration.

Plan your terraform Run:
Before you can create infrastructure, Terraform needs to generate an execution plan.
Run the terraform plan command to view the execution plan for your configuration.

The execution plan specifies what actions Terraform will take to achieve the desired state defined in the configuration, and the order in which the actions occur.
Apply your terraform Configuration:
Run the terraform apply command to apply your configuration.
The output shows the execution plan and will prompt you for approval before proceeding.
After confirming your execution plan,Terraform will create your resources.

Now navigate to the Azure portal in your web browser to validate the resource group.

Inspect your state:
Terraform state is essential for managing change to infrastructure over time.
When you apply your configuration, Terraform writes data into a file called terraform.tfstate. This file contains the IDs and properties of the resources Terraform created
It is necessary to preserve the state file for the entire life cycle of the resources.
Inspect the current state using terraform show.

To review the information in your state file, use the terraform state command.

Change Infrastructure:
In the previous part of this article you created your first infrastructure with Terraform: a resource group.
In this part, you’ll modify that resource by adding tags.
and see how Terraform handles change.
So what do you have to do is to:
1- Open your main.tf file in the terraform-azure directory.
2- Edit the azurerm_resource_group resource in your configuration and add the tags block as shown below:

3- After changing the configuration, create a new execution plan to show what actions Terraform will take to effect the change.
by running this command :

Saving an execution plan with the out flag ensures your terraform apply operation runs the exact plan rather than applying new changes you may not have approved.
This capture indicates that the resource will be updated in place with the ~ symbol beside the resource group. Your new resource attributes, indicated with the + symbol, will be added to the resource group.
4- After generating an execution plan, apply the “newplan” execution plan.

If you want to check the new values associated with your resource group run:

Destroy Infrastructure:
Some changes will force Terraform to destroy and then recreate the resource.
For example, changing the name or location of your resource group will force Terraform to recreate the resource. However, adding tags to a resource group will be an incremental change as seen recently.
If you want to remove the infrastructure from your azure cloud account use terraform destroy.
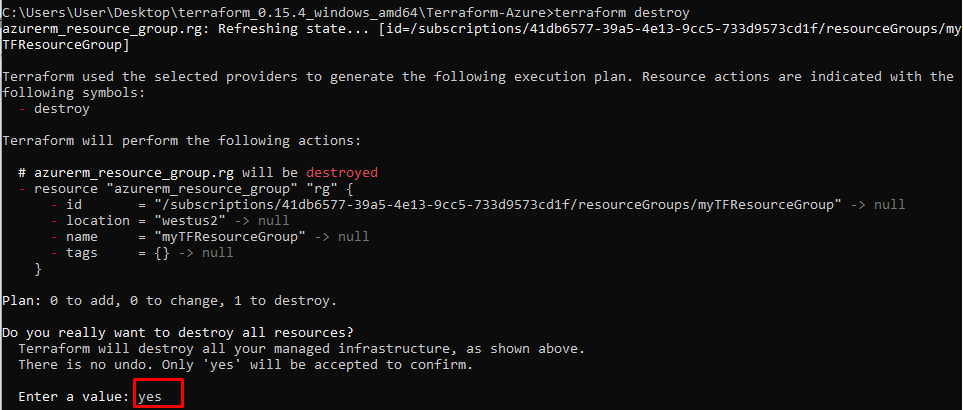
The – prefix indicates that the instance will be destroyed
When prompted, type yes to execute this plan and destroy the infrastructure.

Terraform determines the order in which things must be destroyed.
Conclusion:
I hope this article helps you get started with infrastructure deployments using Terraform on Microsoft Azure or helps you improve on what you’ve already done so far!